Thursday 29 December 2011

Butterscotch Oat Thins - Mom

These never fail to garner compliments that far exceed the effort required to make them.  Honestly, you can't imagine, you just have to make them and start sharing.  From the UCW cook book, contributed by Corky Sawyer, who just might be one of the cleverest home bakers in the world, really just bake these, you'll thank me. 
Butterscotch Oat Thins
 
Pre-heat the oven to 300^F (150^C)
 
In a 13inch by 9inch ungreased and unlined square pan mix together
2 cups rolled oats
1 cup packed brown sugar
1 tsp baking powder
1/2 tsp salt
 
Pour over
1/2 cup melted butter
1/2 tsp vanilla
 
Mix thoroughly then spread it out into an even layer and press down firmly with the back of a spoon.
 
Bake for 20 minutes.
  
Take out of the oven and sprinkle generously with chocolate chips and leave them to melt.  Spread the chocolate chips to form a smooth top.
  
At this point your mouth should be watering but I must advise patience.  If you try to cut them right now, they will crumble, you'll have a pile of, admittedly yummy, rubble with melted chocolate acting like slimy glue.  Leave them to cool right down until the bottom of the pan is no longer warm.
  
Then cut them into squares or rectangles, or as I've decided recently long fingers.
 
They really are too yummy to share but you probably don't want to have to run a marathon to burn off this many calories so offer them round, the ratio of accolade to effort is ridiculously disproportionate.

Monday 26 December 2011

a few desserts

Being busy socializing this holiday season means that most of my baking has deviated from the blog agenda, but I don't like the idea of not posting just because I'm not doing family recipes.  And I'm a bit proud of my efforts so I might as well show off.

First up, my croquembouch! Making the profiteroles was super easy, as was making the orange blossom flavoured pastry creme to fill them. The spun sugar/caramel was a bit more difficult, I had to have a few tries to make it without burning it. My downfall, I think, was in over-filling the profiteroles because they were very heavy and as I built the tower up higher, it started falling in on itself, I don't have a croquembouch cone so I was free-forming the tower which might have been my other downfall. Never the less, I was well pleased with myself. Delia Smith's choux pastry recipe (x4) and a basic pastry creme recipe (x4) with orange zest and orange blossom water added instead of vanilla (I read about 5 pastry creme recipes and can't remember which one I used).  I decorated it with spun sugar and hand piped chocolate stars.

Second is my baked chocolate and orange mousse.  James Martin rarely sends me wrong, I added a shortbread base as I was afraid of it sticking to the bottom or not being able to serve it neatly and decorated with candied orange slices.  Much as I love James' love for desserts, I think he doesn't realize that most people don't need as big a serving has he indicates, the full recipe stated serves 4, I also only made a half recipe of mousse and it easily made 6 generous slices.

Lastly is my Christmas dinner dessert, Chocolate and Chestnut souffle Mont Bry, based on a Larousse Gastronomique recipe (I added a bit of cocoa powder to make it chocolaty).  I don't have a souffle dish, nor do I have 6 ramekins, so I used 4 mugs, there wasn't enough mixture to fill them right to the top as per instructions (I guess my mugs were a too big) so they didn't rise much over the top of the mug and the slanted sides of the mug probably added to the result of the souffles capsizing a bit, but not bad for a first attempt.

Sorry, I haven't written out the recipes, but I have referenced what I can remember so you can so you can go track them down if you're interested.

Sunday 11 December 2011

Pillow Cookies

This post is for my niece Kayla who seemed to think it was the neatest thing to have a brownie inside a cookie. Kayla and I spent some time at my parent's together a few summers ago, it was really nice to have some one on one time with her, and in keeping with family tradition we did some baking together.  I kind of like the idea of the new generation making memories in the kitchen and it was fun to be a part of it with her.  When Kayla talks about these (and I'm so pleased she remembers them and mentions them on occasion) she calls them Pillows Cookies, and it does look like the cookie version of a blanket of dough pulled up over a pillow of brownie, and more than one cookie I suppose means more than one pillow, so I guess she is correct in her naming of them.
  
This is more about technique than a given recipe, but we made chocolate chip cookies over chocolate brownies.  One thing you have to be careful about, if your brownie is too rich and squishy it won't stay firm and look like a pillow it will sink in the second baking and form a thin layer inside the cookie instead of forming the 'pillow', if it is too cake like it'll dry out in the second baking. 
 
See my previous post for the cookie dough recipe.  I halved the following recipe and it still made more brownie than I needed for the cookies.
 
Chocolate Brownies
 
Pre-heat your oven to 350^F (177^C)
 
Cream together
1/2 cup butter
2 squares of melted unsweetened baking chocolate
       (baking chocolate is 1 U.S. oz per square so that's approx 28 grams per square)
1 cup sugar
 
Then add in and mix well
2 eggs
 
Finally stir in
1/2 cup flour
1/2 cup chocolate chips (this was Kayla's idea, and a good one it was)
 
Spread into a greased and flour dusted 8 inch square pan and bake for 25 - 30 minutes.
 
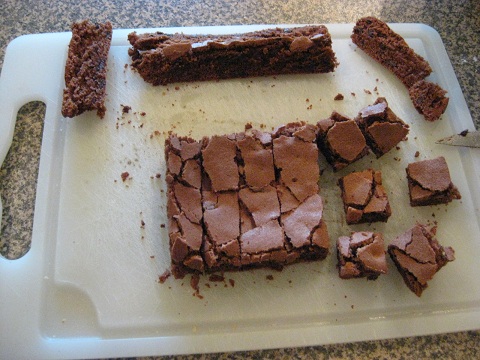
Let it cool in the pan for a few minutes and it will pull away from the sides, then you can turn it out onto a wire rack and let it cool down completely.  Then trim the sides and cut it into 1 inch to 1 1/2 inch squares.  I love the fragile, crackly top of a good brownie.

 
Scoop up about 2 tbsp of cookie dough and form into a ball, then press the brownie down into the ball until the top is flush with the dough.
 
Then take another table spoon of dough and spread it over the top of the brownie, make sure the brownie is sealed tight inside the ball of cookie dough and put it on a baking sheet.  Place the cookies a good 5 inches apart because these spread out big time.  Once you have a sheet full of cookies put it in the fridge for 10 - 15 minutes, if your dough is stiff enough you don't have to do this but if not, the cookie could spread too fast and you don't get the blanket over the pillow, you end up with an exposed brownie on top of a cookie.
 
Bake for 7 - 10 minutes, same as a normal chocolate chip cookie, remember the brownie inside is already cooked so doesn't actually need to be baked again.
 
They are monstrously huge with a distinctive bump of the brownie pillow in the middle.  You can see how big they really are when they're side by side with some regular chocolate chip cookies on the right.  But if you've read this far, what you're probably interested in seeing is the inside, check it out!
 
You’re limited only by your own imagination, chocolate brownie in a blanket of chocolate chip cookie is heaven but imagine peanut butter cookie or vanilla cookie, how about a white chocolate ‘blondie’in a blanket of double chocolate cookie, take your two favourite combinations and start merging and if you come up with an amazing combination, let me know!

Chocolate Chip Cookies - Mom

Ahhh, chocolate chip cookies, the gold standard of childhood home baking memories, I think this was the most often baked recipe in our home. So with credit to the back of the packet of chocolate chips, I present our family version of the Hershey's Chocolate Town Chip cookie. There isn’t much variation on the recipe, the only difference is we used ground walnuts instead of chopped so you didn’t bite into a crunchy piece of walnut, it made the dough a little stiffer and sometimes the cookies stayed in little humps while baking instead of spreading out into flat discs, but they still tasted good.
Making them smells like home.
Chocolate Chip Cookies
 
Pre-heat your oven to 375^F (190^F)
 
Cream together until smooth and pale and you can no longer feel any grains
1 cup shortening or 3/4 cup butter or margarine
1 cup brown sugar
1/2 cup sugar
 
Then add to the mixer
1 tsp vanilla
2 eggs
beat until fluffy
 
Mix in
2 cups unsifted all-purpose flour
1 tsp baking soda
1 tsp salt
 
At this point your mixer is probably ready to give up so by hand mix in
1 cup ground walnuts
     (I couldn't find ground walnuts so I used pieces that I bashed into a paste with my rolling pin)
2 cups semi-sweet chocolate chips (they don't have to be Hershey, we almost always had bulk buy chips)
 
Drop by teaspoon full onto a cookie sheet and bake for 7 - 10 minutes, I like them really toasty brown so I went the full 10 min.

I don't know why, but most of the chocolate chips sank to the bottom of the cookies when baking this time, they were still there in every bite so no matter.

Brioche

I bit of a departure from the family baking, and sorry I'm not up to sharing this recipe it's from The Cook's Guide to Bread if you want to find it, although I warn you these could kill you.  I'm simultaneously proud of my creations and appalled by the amount of butter used in this bread recipe, I used to love a piece of brioche toasted with butter, now I think eating that is like saying this lard isn't fatty enough, I think I'll add some bacon grease.  Even the egg wash was egg yolk only so they came out super shiny and although dark.

But I do kind want to show off my results so please forgive me for expecting you to indulge me.


I had a bit of a revelation, my lovely antique tart tins might actually be brioche roll tins.  I now need to go find someone to give these to immediately so I don't eat them.

Monday 5 December 2011

Butter Tarts - Mom

I felt a bit bad teasing my Dad last week, I have Mom’s recipe book with the butter tarts recipe in it. Which means that she can’t make them because she doesn’t have the recipe anymore. So I thought I’d kill two birds with one stone, have another try at making pastry and get the butter tarts up on the blog so at least Mom has access to the recipe should she decide to take pity on Dad and make him some.  I secretly think he would be happy enough with the lead up to Christmas if it was all about butter tarts, no tree, no decorations, no presents and definitely no snow, just a pile of butter tarts.
I explain butter tarts to my British friends as ‘what you should be eating at Christmas instead of mince pies.’ I hate mince pies, they’re a very evil thing to offer someone who is expecting a sweet treat, and when I offer butter tarts I get a lot of agreement on my stance. It is a personal mission to convert Britain to butter tarts instead of mince pies, that and pronouncing tomato as toe-may-toe, not toh-maa-toh, but the butter tarts are more important and I think I'm losing the toh-maa-toh war.
As for my latest pastry attempt, after intensive consultation with the pastry master (thanks Gram!) and some video searching online for technique, my results have improved greatly. I used Gram’s proportions of 3 cups of flour to 1 cup of fat, cut it in coarsely rather than fine, and add the liquid in 1 spoonful at a time. The pastry was very dry and very stiff, I probably could have used a bit more fat to make it softer, but it was flakier, I think, due to the coarser cutting and fully cooked on the bottom and best of all, didn’t shrink! The tart cases went into the oven the same height as the tin and came out the same height too, I couldn’t believe it! I might start working up the courage to make a pie with a pastry lid, I'll share my pastry recipe when I can get that to work.
Butter Tarts
Pre-heat an oven to 450^F (232^C)
Roll our and line a 12 hole muffin tin with short crust pastry
Mix together either with a hand mixer or a whisk:
1 egg
1/3 cup butter - room temperature soft
1 cup brown sugar
2 tbsp milk
1 tsp vanilla
Stir in
1/2 cup raisins
Fill the pastry 2/3 full make sure you try to get some raisins in each one!

Bake for 10 minutes, then turn the oven down to 350^F (117^C) and bake for another 10 - 15 minutes

Christmas Pastry Perfection.

***Update:  My Mom made some butter tarts for my Dad and sent me a few pictures.

Compare her tarts below to mine above.  Mom got a better baked sugar crust on the top of hers.

Here's my happy pappy with his butter tarts!