Showing posts with label Cookies. Show all posts

Tuesday, 5 February 2013

Nutella Thimble Cookies

It's World Nutella Day and since my niece Kayla is a nutella fiend*, but all the way over in Canada, I thought I'd long-distance-tease her with some nutella thimble cookies.


I used the same recipe as my birds nest cookies but omitted the step of dunking the dough in egg white and rolling it in coconut.  Then I filled with nutella instead of jam.


*Kayla and I both think that the ultimate spa day would involve relaxing in a giant hot-tub-sized vat of nutella.

Thursday, 20 December 2012

Krumkake or Krumkaga - Mom


I don't think there was a December that went by that my Dad didn't request we have these, but I can only remember them happening once.  As for my sisters, Allana remembers them a few times while Heather has vague shady thoughts of them but no real memory.  To be honest I don't think I'd remember them either if I hadn't helped make them one year.  I have to admit it is still a highlight of my childhood baking memories, taking turns with my Mom operating the cast-iron krumkage iron and wrapping each hot cookie waffle around the barrel of the turkey baster.  I used to chime in with my Dad in his campaign for krumkage partly because anything served with whipped cream rated highly in my books and partly because making them with Mom was such a vivid and enjoyable memory that I wanted to repeat it.  And the beautiful swirling pattern pressed into the cookie from the iron mesmerised me with its old world charm.

It is testimony to how much my Mom loves my Dad that she went out and bought a krumkake iron and tried to make them.  My Mom doesn't do anything if it can't be described as efficient and let's face it, baking cookies one at a time, one side at a time, on the stove top in a specialised waffle iron and then hand molding them into shape is the opposite of efficient.  Given that they were Christmas treats in our home and Mom was responsible for making Christmas happen - everything from decorations, to presents, to the big dinner, to cards for friends and family, to trips to the mall Santa, and to baking - well eventually something was going to have to give and krumkake had it's fate marked early.  It didn't stop Dad from asking.

Last summer I asked Mom if I could inherit the krumkake iron and I think the only thing I could do as a grown up to bring her more joy would be to give her a grandchild.  She said, if it turns out I don't want the iron I can give it away or to charity or the bin man.  Poor Mommy, I think her hatred of that iron and the baking process it represented grew exponentially every time she was asked to make them.  I, on the other hand, gleefully re-packed my suitcase three times to ensure that it would be fit for travel and not put my case over the airline weight limit, it's that heavy.

Once I got it back to London I had my krumkake iron fired up within a few days.  Now here's where my experience with the iron differed from Mom's.  I mixed up the batter and it was quite thick, I had to google to learn that it can be thinned down with water if need be, and after doing so still I had to dollop it onto the iron with a small ice cream scoop.  I remember Mom's batter being really thin and there's evidence of that in all the splatters on the recipe page of her minnesota viking cook book that I inherited along with the iron.  Mom also claims that the high butter content of the batter melted out during cooking, dripping down onto the burner, and sending great clouds of smoke through the house.  I remember the chaos of smoke-detectors and open windows in December while we were making them so she wasn't inventing problems to get out of making them.  I didn't skimp on the butter but I didn't have any issues with the butter melting, out at times I even had to brush the plates of the iron with a bit extra butter.  The only time I had any smoke problems is when crumbs of the batter would flick off the iron as I was peeling the cookie out and land on the burner - those crumbs went up in plumes of smoke and were charred in seconds.  It still took me quite a few attempts to get the technique right but I never had any of the neighbours concerned that I was burning down my flat, as evidenced by my stove once I finished.

Since my krumkake iron is old-fashioned cast iron, between uses I've been giving it a good wipe to get all the butter off then a quick smear with vegetable shortening and reheating to season the plates with a fat that won't turn rancid during its downtime - advice from my Gram LuVerne who is a font of tips and tricks, she's more clever than pinterest.


Krumkake

I cut the recipe by 1/3 because I had no desire to make 60 krumkake and it's the reduced quantity I've detailed here, times by three if you want a mountain of krumkake.

If you have an old krumkake iron, start to heat it on the stove on medium heat, it needs to heat for at least 40 minutes to get thoroughly hot.  If you have a newfangled electric one, follow the instructions that came with the machine.

Using an electric mixer beat until fluffy
1 egg
slowly add in and continue beating for another 5 minutes
1/3 cup of sugar

Add
1/3 cup melted butter - cooled
1/4 cup evaporated milk
1/2 tsp vanilla
give it another good beating for 2 minutes

Fold in
1/2 cup flour

The batter should be fairly thick, now you get to leave it for about 20 - 25 minutes, it will mature and continue to thicken - which according to my google results is important but if it ends up too thick you can thin it down with a few spoonfuls of water.

Once the batter has rested and the iron is hot, put a small dollop of batter on the iron and close it quickly, give the handle a light squeeze to press the batter out thinly between the plate.  Cook for 30 seconds on the first side then 40 seconds on the second side, flip back to the level side and open.

Peel the cookie off the iron and roll onto a wooden cone (I don't have a wooden one so I fashioned mine out of the core from a kitchen paper roll wrapped in baking parchment) and leave to cool.  Repeat ad nauseum until you've used up all the batter, over all my tries I've gotten between 14 and 18 cookies, theoretically based on the math of the recipe you should be able to get 20, but I'm sure iron sizes vary.  If your iron starts looking a bit dry between cookies give it a quick brush with some butter.

Some were better than others, and some of the results were inedible (which made me popular with the ducks in the park) but I got there in the end.

I ate the first with whipped cream out of respect for tradition, then the rest with fruit, cut up bits of mango and clementine segments in an attempt to make them less unhealthy.  When I was talking with Allana about her memories of them she said she remembered them with cut up bananas so I thought I'd give that a try and what goes better with banana than Nutella!

Wednesday, 10 October 2012

Cinnamon Birdsnest Cookies with Pumpkin Pie Filling

A last minute invitation to a friend to come over on Monday for a make-shift Thanksgiving dinner meant I had to whip up something for dessert.  I kind of wanted something fun for dessert since it was only the two of us and not a full banquet, I also wanted to send her home with the dessert leftovers and, let's face it, a pie isn't the easiest thing to travel with.  So I decided to make cookies with pie filling.

I made a half recipe of my pumpkin pie filling since this cookie recipe said it makes 36 cookies and I remember that it did indeed make a lot of cookies, but when it came time for the shaping I realized that the cookie size in the recipe was considerably smaller than I'd need to fill with pie.  I ended up with 14 cookies and far too much filling leftover so I made a pie as well.  The cinnamon cookie dough compliments the pie filling really well and makes it less rich than a full slice of pie but still gives you that emotional warmth that you can only get from pumpkin pie.

The bad estimate for combining recipes wasn't the only baking disaster on the day, I also dropped half the egg shell into the cookie batter where it promptly got bashed up by the paddle of the mixer.  I stopped the mixer immediately and started pawing through the batter with a spoon realizing the futility of my attempt to dig out all the bits of shell.  I stared at it for a while wondering what my options were when I decided to scrape the lot out of the mixing bowl and push it all through my sieve, I was floored at the sight of all the tiny shards of eggshell that were caught by the sieve, I wouldn't hesitate to say I got all of it - batter rescued.

Cinnamon Birdsnest Cookies

Pre-heat the oven to 350^F (180^C)

Sift together in a bowl
90g self-raising flour
1 tsp cinnamon
3 tbsp rice flour

In the bowl of a stand mixer, or with a hand mixer, cream together
70g unsalted butter - room temperature soft
4 tbsp sugar

Beat in until fluffy
1 egg

Fold the sifted dry ingredients into the wet until just mixed.

I used an icecream scoop with a 25ml bowl on the scoop to dollop out the cookies onto the baking tray then with a damp finger I made a large well in the middle of each scoop.

Spoon in your pumpkin pie filling into the well, filling right to the top.

If you use my pumpkin pie filling, I would probably suggest multiplying the cookie recipe by 5 times the above amount for a half-recipe, otherwise have a small (7 - 8 inch) pie shell at the ready for the remaining filling.

Bake for 10 minutes.

Sunday, 5 August 2012

Shortbread - Grandma Ross

I have been avoiding a rather close to my taste buds but controversial British topic, Shortbread.  A lot of Brits are highly opinionated about their shortbread, it ranks quite highly, if not at the very top, on the best ever biscuit leader board over here, and the Scottish are by far the most strongly opinionated about what makes the perfect shortbread, which is fair enough as they invented it.  But since there's a pretty thick layer of tartan under my Canadian skin I feel entitled to join in the discussion.

And my opinion was formed by the ideal standards set by my Scottish Granny, good shortbread should be thick and pale, no brown edges allowed.  I prefer individual biscuits made by cookie cutter shapes, rather than a large round that is broken into triangles or petticoat tails, I'll tolerate a bar that can be broken into fingers but I'd prefer the fingers to be baked individually.  While novelty shortbreads with nuts, chocolate, fruit, etc, are highly enjoyable, they are inferior to plain shortbread.  This is a biscuit where less is more, the beauty is in the delicate balance of basic ingredients that combine for a perfect flavour and texture.  Speaking of texture, they should be perfectly dry, bite or break to a smooth surface with a fine interior texture, and melt in your mouth.  I know there's a lot of people out there who think shortbread should be flaky when broken or the crumbs should feel like sugar-sand in your mouth, but I disagree they should feel smooth and melt.  And no dunking in your tea.

Sadly Grandma's recipe has been lost over the years but according to my Mom there was no big family secret for her recipe, just that she cut some of the wheat flour with both rice flour and corn flour and only used icing sugar and real butter - no substitutions on the butter, her magic was mostly in the execution.  Her shortbread was perfect little frilly circles, about half as thick as they were wide, pricked with a fork, and no darker out of the oven than they were when they went in, if it weren't for the fork marks you'd have trouble telling the top from the bottom they were so pale.  She was an expert. 

Many recipes I've looked up have a 3-2-1 ratio, three parts flour, two parts butter and 1 part sugar, they suggest replacing up to half the flour with rice or corn flour.  I have found that 2 parts butter creates a biscuit that spreads too much but that's my only departure from convention.

Along the way I learnt that rice flour keeps the shortbread white and cornflour makes the texture finer, and that the quality of butter is the biggest influence on the final taste of the biscuits.


Shortbread

Preheat the oven to 300^F (150^C)

Please note, - all these measurements are by WEIGHT not volume.
Cream together
3 3/4 oz unsalted butter, very very soft butter
2 oz icing sugar

Mix in by hand
6 oz mixed flour, a blend of: 3 oz plain (all purpose) flour, 1.5 oz corn flour, and 1.5 oz rice flour

Tip the dough out onto the counter and give it a very gentle knead to bring it all together if necessary, then roll it out to 1/2 inch thickness.  The dough shouldn't roll too easily or smoothly, there should be a few protest cracks around the edges, the more easily it rolls the more it will spread in the oven and we don't want spreading, we want chunky thick biscuits.  Also, don't chill the dough before baking, it will brown if you do.

Using a small fluted 1 1/2" cookie cutter cut out your cookies and transfer to a baking sheet.  Gather up the scraps once and re-roll and cut again with the cutter.  The second gathering of the scraps, for the third roll and cut, try to roll a rectangle and cut into fingers, shortbread is delicate and overworking will make it tough.


Bake for 20 - 30 minutes, depending on how big they are, until they are crispy dry but not browned, if they start to brown, lower the heat and bake for longer.


***Update:  I think there was a bit of a collective effort to compare shortbread cookies with the family this Christmas up in Kitimat.  I got pictures of Mom's, Allana's, and Gram's shortbread cookies.  Mom's are the three fork pokes, Allana's are the two pokes, and Gram made the diamond and smooth round - aren't they lovely?

I also thought I'd show the picture of Mom v Allana with the bottoms of the cookies.  Mom's are as pale on the bottom as on the top, see what I meant when I said the poke holes are how you tell which side is up, this comes from years and years of practice with your oven temperature.  Allana's are beige on the bottom but they aren't brown so it's still an effort to be proud of, even I'm not as good as Mom yet.

Sunday, 15 July 2012

Peanut Butter Cookies - Mom

FOOD FIT FOR A KING!  My Dad's opinion of peanut butter, and yes he's so emphatic in his opinion that it has to be written in capitals.

I'll be back in Canada in less than a month and my whole family will be able to stand in the same room at the same time, last time that happened was about eight years ago.  It's amazing how so few people can scatter so much geographically, there were a few years when it took 10 times zones to encompass all of us!  I'm looking forward to doing some baking with my nieces and nephews, although some of them are a bit young and will probably just help with licking spoons and eating the finished product.  My Dad is looking forward to the baking as well, my Mom is on a health kick that has her opposed to white flour and refined sugars to Dad's dismay, apparently Dad and I are going to survive on nothing but baked goods while I'm visiting!

So with my Dad on my mind, I thought I'd use the last of my peanut butter brought over from Canada to make some cookies.  Peanut butter cookies are a bit more labour intensive than chocolate chip or oatmeal cookies because the dough has to be rolled into balls then squished with a fork rather than just scooped with and dropped from a spoon.  But it was fun to eat them line by line along the fork groove. 

Peanut Butter Cookies
Pre-heat your oven to 350^F (175^C)
In a mixer cream together
1/2 cup butter
1/2 cup smooth peanut butter
1/2 cup brown sugar
1/2 cup granulated sugar

Add in and beat until fluffy
1 egg
1/2 tsp vanilla

Slowly blend in
1 cup plain flour
1/2 tsp baking soda
1/2 tsp salt

Roll the dough into small balls, about a tsp worth of dough, and place on a cookie sheet, give them room they will spread a lot, then flatten them with a fork.

Bake for 7 - 10 minutes and you will have soft chewy peanutty good cookies.


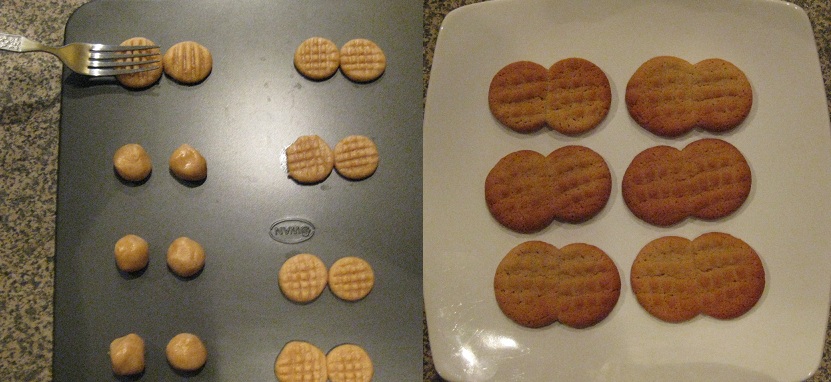
Okay, not traditional in our family at all, but I came across a picture of peanut butter cookies shaped like peanuts and I felt the need to try at least one tray of them.  Take the same amount of dough for a regular size cookie and divide in half, roll into two small balls and place near enough to each other on the tray that they will just touch when fork squished.  Make a double fork squish on each ball at 90 degree angles and make sure that one of them points straight towards the other ball of dough.  The two cookies spread together and form a 'peanut' shaped cookie!

Saturday, 18 February 2012

Oatmeal Cookies - Mom

These are, quite possibly, in my opinion at least, the best oatmeal cookies you will ever taste. There are some combinations of ingredients that are unmistakable winners butter-brown sugar-oats is one of them. Add in some vanilla and sweetened desiccated coconut and you have something amazing. The recipe was contributed to the UCW cookbook as Crunches by Edna Orr, who is a bit of a kindred spirit with Mom when it comes to sharing tactics. She listed the ingredients but not what to do with them maybe she assumed that you already know the basics of how to make cookies so don't need instructions?  Luckily I do know how to make cookies and I can manoeuvre through her badly out of order ingredients.
 
Oatmeal Cookies
 
Pre-heat the oven to 350^F (that’s 177^C)
 
In a mixer beat together until fluffy and pale
1 cup butter
1 ¼ cup brown sugar
 
Then add in and keep beating until well mixed
1 egg
1 tsp vanilla
 
Turn the speed of the mixer down and add in
1 cup flour
1 tsp baking soda
 
Once the flour is fully mixed into the dough, turn the mixer off, take the bowl out and stir in by hand
2 ½ cups rolled oats
1 cup sweetened desiccated coconut
 
Drop the dough onto cookie sheets by the teaspoon full.  If you have extra big cookie sheets, this is the time to use them, I got 80 cookies out of this recipe – 80! 
 
Bake for 10 – 12 minutes until they are caramelised golden brown.


I don't know what happened to my memory but I was not expecting this many cookies from this recipe, eighty!

Sunday, 11 December 2011

Pillow Cookies

This post is for my niece Kayla who seemed to think it was the neatest thing to have a brownie inside a cookie. Kayla and I spent some time at my parent's together a few summers ago, it was really nice to have some one on one time with her, and in keeping with family tradition we did some baking together.  I kind of like the idea of the new generation making memories in the kitchen and it was fun to be a part of it with her.  When Kayla talks about these (and I'm so pleased she remembers them and mentions them on occasion) she calls them Pillows Cookies, and it does look like the cookie version of a blanket of dough pulled up over a pillow of brownie, and more than one cookie I suppose means more than one pillow, so I guess she is correct in her naming of them.
  
This is more about technique than a given recipe, but we made chocolate chip cookies over chocolate brownies.  One thing you have to be careful about, if your brownie is too rich and squishy it won't stay firm and look like a pillow it will sink in the second baking and form a thin layer inside the cookie instead of forming the 'pillow', if it is too cake like it'll dry out in the second baking. 
 
See my previous post for the cookie dough recipe.  I halved the following recipe and it still made more brownie than I needed for the cookies.
 
Chocolate Brownies
 
Pre-heat your oven to 350^F (177^C)
 
Cream together
1/2 cup butter
2 squares of melted unsweetened baking chocolate
       (baking chocolate is 1 U.S. oz per square so that's approx 28 grams per square)
1 cup sugar
 
Then add in and mix well
2 eggs
 
Finally stir in
1/2 cup flour
1/2 cup chocolate chips (this was Kayla's idea, and a good one it was)
 
Spread into a greased and flour dusted 8 inch square pan and bake for 25 - 30 minutes.
 
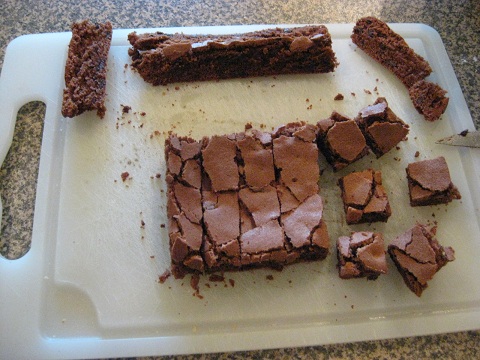
Let it cool in the pan for a few minutes and it will pull away from the sides, then you can turn it out onto a wire rack and let it cool down completely.  Then trim the sides and cut it into 1 inch to 1 1/2 inch squares.  I love the fragile, crackly top of a good brownie.

 
Scoop up about 2 tbsp of cookie dough and form into a ball, then press the brownie down into the ball until the top is flush with the dough.
 
Then take another table spoon of dough and spread it over the top of the brownie, make sure the brownie is sealed tight inside the ball of cookie dough and put it on a baking sheet.  Place the cookies a good 5 inches apart because these spread out big time.  Once you have a sheet full of cookies put it in the fridge for 10 - 15 minutes, if your dough is stiff enough you don't have to do this but if not, the cookie could spread too fast and you don't get the blanket over the pillow, you end up with an exposed brownie on top of a cookie.
 
Bake for 7 - 10 minutes, same as a normal chocolate chip cookie, remember the brownie inside is already cooked so doesn't actually need to be baked again.
 
They are monstrously huge with a distinctive bump of the brownie pillow in the middle.  You can see how big they really are when they're side by side with some regular chocolate chip cookies on the right.  But if you've read this far, what you're probably interested in seeing is the inside, check it out!
 
You’re limited only by your own imagination, chocolate brownie in a blanket of chocolate chip cookie is heaven but imagine peanut butter cookie or vanilla cookie, how about a white chocolate ‘blondie’in a blanket of double chocolate cookie, take your two favourite combinations and start merging and if you come up with an amazing combination, let me know!

Chocolate Chip Cookies - Mom

Ahhh, chocolate chip cookies, the gold standard of childhood home baking memories, I think this was the most often baked recipe in our home. So with credit to the back of the packet of chocolate chips, I present our family version of the Hershey's Chocolate Town Chip cookie. There isn’t much variation on the recipe, the only difference is we used ground walnuts instead of chopped so you didn’t bite into a crunchy piece of walnut, it made the dough a little stiffer and sometimes the cookies stayed in little humps while baking instead of spreading out into flat discs, but they still tasted good.
Making them smells like home.
Chocolate Chip Cookies
 
Pre-heat your oven to 375^F (190^F)
 
Cream together until smooth and pale and you can no longer feel any grains
1 cup shortening or 3/4 cup butter or margarine
1 cup brown sugar
1/2 cup sugar
 
Then add to the mixer
1 tsp vanilla
2 eggs
beat until fluffy
 
Mix in
2 cups unsifted all-purpose flour
1 tsp baking soda
1 tsp salt
 
At this point your mixer is probably ready to give up so by hand mix in
1 cup ground walnuts
     (I couldn't find ground walnuts so I used pieces that I bashed into a paste with my rolling pin)
2 cups semi-sweet chocolate chips (they don't have to be Hershey, we almost always had bulk buy chips)
 
Drop by teaspoon full onto a cookie sheet and bake for 7 - 10 minutes, I like them really toasty brown so I went the full 10 min.

I don't know why, but most of the chocolate chips sank to the bottom of the cookies when baking this time, they were still there in every bite so no matter.

Saturday, 26 November 2011

Thimble Cookies or Jam Thumbs or Bird's Nest Cookies - Mom

These little cookies never had a definite name when we were growing up, but despite that, we always knew what someone was talking about when they were named.  I always thought there was a special secret to these cookies, I think I thought that they formed little dents in the middle naturally, all on their own, like magic.  It wasn't some big revelation when I realized that you had to make the dent with your thumb before baking it was just common sense, but I was surprised to find out that Mom used a thimble to re-define the dent after baking because they often came out of the oven swollen almost shut.  Good advice Mom!

Jam Thumbs

Pre-heat the oven to 350^F (175^C)

Cream together until fluffy
1/2 cup butter
1/4 cup sugar

Mix in
1 egg yolk (save the white for later)
1 tsp vanilla

Finally stir in
1 cup flour

Shape the dough into balls, dip the balls in the egg white then roll in sweetened dessicated coconut and place on a cookie sheet.  Make a dent in the middle of the ball with your thumb before baking.

Bake for 10 - 12 minutes then take out of the oven and use a thimble (or in my case a slim bottle with a very small lid) and widen the dent to make it bigger before transferring to a wire rack to cool, work quickly to fill with raspberry jam while they're still warm.

Wednesday, 16 November 2011

Pinwheel Cookies

I’ve gotten ahead on the baking and behind on the blogging, the result is, hopefully, two posts this week.

My mom had a rather meagre selection of cook books when I was young, and even fewer on baking, but I can still remember looking through them and thinking the few pictures were amazing and inspiring. Looking back now those same photos look horribly dated and, worse, very pedestrian, but they served their purpose at the time and got me to experiment with new recipes all the same.
 
One of the favourite experiments were the pinwheel cookies, as my sister Heather said, “They weren’t made very often but when they were made they were good.” Well, they weren't made very often because I was the only one who made them, and I did share baking duties with my sisters and mom.  The pinwheels sparked my love of icebox cookies as the ultimate in convenience baking and the swirls of vanilla and chocolate cookie dough always raised the question of how do you make that? Which made me feel very smart because I was the one who could do it. My mom recently claimed on one of her visits that she used to make the pinwheel cookies as well, but when she watched me make them for the blog (and to send some to Allana and Dad), she then backed down from her claim saying she doesn’t remember ever having to roll out and sandwich together two flavours of dough, I’ll let her off the hook for trying to steal my thunder because she backed down so readily.
 
Pinwheel Cookies
 
Mix together until smooth
2/3 cup butter
1 cup brown sugar
 
then add and mix well
1 egg
1 tsp vanilla extract
 
In a separate bowl, mix together
2 cups flour
1/4 tsp salt
1/2 tsp baking soda
then stir into the batter until smooth.
 
To make the pinwheels, divide the dough in half, put half onto a sheet of baking paper and leave the other half in the mixing bowl.
 
Add to the dough in the bowl
2 tbsp cocoa powder (make sure it's dark cocoa powder)
and mix until the dough is chocolate
 
Roll out the chocolate and vanilla doughs on separate sheets of baking paper to 1/8 inch thick and to the same length, but make the chocolate one a bit narrower.  A trick I have for making them very rectangular when they start to go oval is to cut off the rounded ends of the oval, then cut those pieces in half, turn the two halves so that the corners are to the outside and patch them back onto the main piece of dough.  The dough is really forgiving and you're going to roll everything up into a log so no one will see any of the patchwork.  If they're not rectangular you get quite a few 'dud' cookies when you start cutting the ends.

Then sandwich together, chocolate on top of vanilla, try to get the chocolate in the middle of the vanilla so there is a border on both sides.  You want a border on both sides so the centre of the pinwheel has a nice tight curl in the middle and so the vanilla seals the chocolate on the outside of the roll.  I didn't do a very good job, it's been a while since I made these and it requires more conviction than I had to flip the chocolate over.

Then roll into a log, wrap with one of the sheets of paper and freeze for at least an hour.  At this point you can take the dough out of the freezer to slice and bake or divide into portions to freeze to use later (it'll keep in the freezer for 1 - 3 months depending on how cold your freezer is).
Preheat the oven to 350^F (around 175^C), slice the log into 1/4 inch cookies, the size of the cookie is not based on the thickness of the slice but the fatness of the log, don't be tempted to cut them thicker to make them bigger, it won't work.  Bake for 6 - 10 minutes, oven temperatures vary as well as the coldness of the dough, as the dough warms up by sitting on the kitchen counter while waiting for successive trays to bake they will need less time.

You can see what I mean about not getting a tight curl in the middle, I didn't have enough border of vanilla on the inside edge of the roll.  They were still delicious.

Monday, 24 October 2011

Sugar Cookies - Mom

With my mom visiting, I decided it was time to re-enact a mommy-daughter memory scene, not quite the same without my sisters here, but it had to be done.  Having claimed my inheritance of some fragile and grubby looking cook books, I searched out the recipe for sugar cookies and started making the dough.  My memories of making sugar cookies are primarily of decorating them, I can remember once or twice getting to help cut out the cookies but I can see how this would have been frustrating in the extreme for Mom, so I'm not surprised that we came home to baked cookies and were allowed to 'help' ice them.

Sugar Cookies

Beat together until fluffy:
1/2 cup butter
1/2 cup sugar

Then add in
1 egg yolk
1/2 tsp vanilla

While mixing measure:
1 1/2 cups flour
1 1/2 tsp baking powder
1/4 salt
and sift together

Add the dry ingredients alternately with
3 tbsp milk
Do 3 turns of flour mix and 2 turns of milk, starting and ending with flour.

Once all mixed, wrap it in plastic and chill for at least an hour.

Pre-heat the oven to 375^F (190^C)

Roll out the dough to 1/4 inch thick and cut into shapes, try to get the shapes as close together as possible to get as many cookies from the rolling and transfer the cookies to an ungreased cookie sheet.


Two people cutting out the dough creates a lot of waste, one of us had to stop.
Gather the scraps and re-roll and cut again, then repeat but don't roll the dough more than 3 times - use a knife to cut the last rolling into shapes, or make one big plaque cookie.

Bake for 8 - 10 minutes, unless you have a fan assisted oven or rolled them slightly thinner than 1/4 inch (like me) in which case they could be done in only 5 minutes, they should have a light golden tint around the edges.


Once cool, they can be decorated.  Mom used to make a thick runny icing from just icing sugar and lemon juice with a bit of food colouring which we would smear onto the cookies with a knife then add sprinkles and silver balls.  At times we also got to use the icing squirter with some coloured butter cream icing (butter, icing sugar, and a few drops of water and food colouring, mixed to paste consistency) and pipe shapes to decorate.  Sadly, my cookie decorating skills have not improved much beyond the capabilities of a 7 year old, I think this may be genetic as Mom's skills are no better, but we had fun (when I wasn't snappy) and I now more than understand her frustrations when making sugar cookies.


A fluffy yellow bunny, a high-point in the decorating process (if you haven't seen coloured bunnies, please watch more cartoons).


A not so well dressed boy.


A grizzly bear that more closely resembles a morlock.

Wednesday, 5 October 2011

Stem Ginger Cookies

The previous recipe from Gram LuVerne was the starting point partly because she sent me some recently.  As a thank-you I sent her some of my ginger cookies back, and she asked for my recipe, so begging forgiveness for the almost immediate detour from the purpose of this blog, I figured that I might as well post that here too.  My recipe is for ice-box cookies made with crystallized stem ginger, easy to make and so easy to make look elegant and sophisticated.  I also sent some to my Dad (the recipe makes lots and Mom was acting as the courier, why not right?) and even though he isn't a fan of ginger, he really liked them, although that might have more to do with his perception of the infrequency in which baked goods appear in his life right now, sympathy is hard earned in our family.
Stem Ginger Cookies

Cream together in a mixer:

1 cup butter
1 cup white sugar

When fluffy, mix in:

1 egg

In a separate bowl, mix together:

2 2/3 cups flour
1 1/2 tsp ginger
1/2 tsp baking powder
1/4 tsp salt

When the wet ingredients are looking smooth again, reduce the speed of the mixer and add the dry ingredients, mix just until fully incorporated.

Then stir in:

3/4 cup of crystallized stem ginger (candied ginger)
     that has been chopped into 1 cm cubes

Shape into a brick (or log, or two) and wrap in baking paper and put in the freezer for at least 2 hours (it will keep in the freezer for up to 1 month but put it in a plastic bag if you're storing it for more than a day).

When you're ready to bake, pre-heat the oven to 375^F, or 190^C

Slice the brick into 1/2 cm cookies and place on a baking tray, leave a good amount of space between them, they grow!

Bake for 8 - 12 minutes, it really varies on how cold your freezer is and if you let the dough partially thaw before baking, but they're done when they're golden brown around the edges.

Saturday, 1 October 2011

Ginger Snaps - from Gram LuVerne

It seems very appropriate to start an archive with a very traditional classic, since I love ginger and so does my Gram LuVerne, I thought the best one would be her recipe for Ginger Snaps. She got this recipe from her mother-in-law, my great-grandma Emilie Pierce, in 1941. There are no eggs in this recipe so the dough works a bit like shortbread, but dark molasses and quite a bit of ginger pack a great flavour punch and the aroma in my kitchen as they bake is heavenly. Gram sent me some of these a few weeks ago whem my mom came to visit, the flavour was rich and spicy, perfect for dunking in a cup of tea.

Pre-heat the oven to 350^F (176^C)

Combine in a mixer:

1 cup butter (or 1 cup margerine & 1 tbsp oil)

¾ cup white sugar

¾ cup dark molasses

Once fully mixed, add in:

1 tsp baking soda dissolved in 3tbsp boiling water

Sift together, then mix into the wet ingredients:

4 cups flour – 4 ½ to make a stiff dough for a cookie with a good snap!

2 tbsp of powdered ginger1 tsp each of cloves and cinnamon (but these are optional, Gram usually doesn’t use them and neither did I)

Roll the dough into round balls and press flat with the base of a cup dipped in sugar, Gram uses the bottom a small glass pitcher dipped sugar to make a pretty star design, I don’t own anything so fancy so used the bottom of a jam jar as it was the best I could find for some decorative effect that didn’t have a brand logo, country of origin mark or a recycle symbol. The dough can also be rolled out and cut into shapes for a very thin cookie or just dropped by the spoonful.

Bake for 8 – 10 minutes


Then make a cup of tea and enjoy.