Sunday, 5 August 2012

Shortbread - Grandma Ross

I have been avoiding a rather close to my taste buds but controversial British topic, Shortbread.  A lot of Brits are highly opinionated about their shortbread, it ranks quite highly, if not at the very top, on the best ever biscuit leader board over here, and the Scottish are by far the most strongly opinionated about what makes the perfect shortbread, which is fair enough as they invented it.  But since there's a pretty thick layer of tartan under my Canadian skin I feel entitled to join in the discussion.

And my opinion was formed by the ideal standards set by my Scottish Granny, good shortbread should be thick and pale, no brown edges allowed.  I prefer individual biscuits made by cookie cutter shapes, rather than a large round that is broken into triangles or petticoat tails, I'll tolerate a bar that can be broken into fingers but I'd prefer the fingers to be baked individually.  While novelty shortbreads with nuts, chocolate, fruit, etc, are highly enjoyable, they are inferior to plain shortbread.  This is a biscuit where less is more, the beauty is in the delicate balance of basic ingredients that combine for a perfect flavour and texture.  Speaking of texture, they should be perfectly dry, bite or break to a smooth surface with a fine interior texture, and melt in your mouth.  I know there's a lot of people out there who think shortbread should be flaky when broken or the crumbs should feel like sugar-sand in your mouth, but I disagree they should feel smooth and melt.  And no dunking in your tea.

Sadly Grandma's recipe has been lost over the years but according to my Mom there was no big family secret for her recipe, just that she cut some of the wheat flour with both rice flour and corn flour and only used icing sugar and real butter - no substitutions on the butter, her magic was mostly in the execution.  Her shortbread was perfect little frilly circles, about half as thick as they were wide, pricked with a fork, and no darker out of the oven than they were when they went in, if it weren't for the fork marks you'd have trouble telling the top from the bottom they were so pale.  She was an expert. 

Many recipes I've looked up have a 3-2-1 ratio, three parts flour, two parts butter and 1 part sugar, they suggest replacing up to half the flour with rice or corn flour.  I have found that 2 parts butter creates a biscuit that spreads too much but that's my only departure from convention.

Along the way I learnt that rice flour keeps the shortbread white and cornflour makes the texture finer, and that the quality of butter is the biggest influence on the final taste of the biscuits.


Shortbread

Preheat the oven to 300^F (150^C)

Please note, - all these measurements are by WEIGHT not volume.
Cream together
3 3/4 oz unsalted butter, very very soft butter
2 oz icing sugar

Mix in by hand
6 oz mixed flour, a blend of: 3 oz plain (all purpose) flour, 1.5 oz corn flour, and 1.5 oz rice flour

Tip the dough out onto the counter and give it a very gentle knead to bring it all together if necessary, then roll it out to 1/2 inch thickness.  The dough shouldn't roll too easily or smoothly, there should be a few protest cracks around the edges, the more easily it rolls the more it will spread in the oven and we don't want spreading, we want chunky thick biscuits.  Also, don't chill the dough before baking, it will brown if you do.

Using a small fluted 1 1/2" cookie cutter cut out your cookies and transfer to a baking sheet.  Gather up the scraps once and re-roll and cut again with the cutter.  The second gathering of the scraps, for the third roll and cut, try to roll a rectangle and cut into fingers, shortbread is delicate and overworking will make it tough.


Bake for 20 - 30 minutes, depending on how big they are, until they are crispy dry but not browned, if they start to brown, lower the heat and bake for longer.


***Update:  I think there was a bit of a collective effort to compare shortbread cookies with the family this Christmas up in Kitimat.  I got pictures of Mom's, Allana's, and Gram's shortbread cookies.  Mom's are the three fork pokes, Allana's are the two pokes, and Gram made the diamond and smooth round - aren't they lovely?

I also thought I'd show the picture of Mom v Allana with the bottoms of the cookies.  Mom's are as pale on the bottom as on the top, see what I meant when I said the poke holes are how you tell which side is up, this comes from years and years of practice with your oven temperature.  Allana's are beige on the bottom but they aren't brown so it's still an effort to be proud of, even I'm not as good as Mom yet.

Sunday, 22 July 2012

Panda Bread

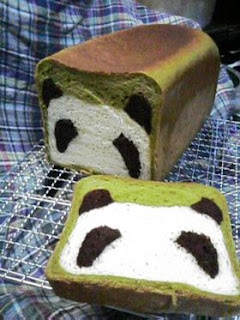
This was floating around on Pinterest a while ago and it got stuck in my brain, so while doing my laundry today and having to wait around for the washing machine to do its thing I thought I'd have a go at it. 

I did a bit of googling and found what has been credited as the original post from TaroTaro ( http://cookpad.com/recipe/349795 ) but it's in Japanese and I wasn't going to get anywhere with the auto-translation.  So another try found a blog called "Do What I Like" by Florence ( http://wlteef.blogspot.co.uk/2007_10_01_archive.html#!/2007/10/panda-bread.html ) who translated it into English otherwise I wouldn't have tried, thank-you Florence!  She also points out that October 15th is world bread day, which I think should be a holiday observed by all.

It was a lot easier to assemble than I thought, and a bit more fun, I almost wish it had taken longer to do but longer would have meant frustration so maybe it's better that it was fast.  I didn't have green tea powder so I used food colouring, I never thought something could be both lurid and pastel at the same time.

It split while baking where I had the wrinkle that I couldn't smooth out in the outer layer, I'm also thinking Taro has a special bread tin with a lid or something that lets her get a flat top on the loaf, but I'm still proud of effort. 

For a first attempt, I think it's sufficiently comical!

If you go to Taro's website she has a collection of pictures from over a hundred people who have tried and their sometimes hilarious results!

Sunday, 15 July 2012

Peanut Butter Cookies - Mom

FOOD FIT FOR A KING!  My Dad's opinion of peanut butter, and yes he's so emphatic in his opinion that it has to be written in capitals.

I'll be back in Canada in less than a month and my whole family will be able to stand in the same room at the same time, last time that happened was about eight years ago.  It's amazing how so few people can scatter so much geographically, there were a few years when it took 10 times zones to encompass all of us!  I'm looking forward to doing some baking with my nieces and nephews, although some of them are a bit young and will probably just help with licking spoons and eating the finished product.  My Dad is looking forward to the baking as well, my Mom is on a health kick that has her opposed to white flour and refined sugars to Dad's dismay, apparently Dad and I are going to survive on nothing but baked goods while I'm visiting!

So with my Dad on my mind, I thought I'd use the last of my peanut butter brought over from Canada to make some cookies.  Peanut butter cookies are a bit more labour intensive than chocolate chip or oatmeal cookies because the dough has to be rolled into balls then squished with a fork rather than just scooped with and dropped from a spoon.  But it was fun to eat them line by line along the fork groove. 

Peanut Butter Cookies
Pre-heat your oven to 350^F (175^C)
In a mixer cream together
1/2 cup butter
1/2 cup smooth peanut butter
1/2 cup brown sugar
1/2 cup granulated sugar

Add in and beat until fluffy
1 egg
1/2 tsp vanilla

Slowly blend in
1 cup plain flour
1/2 tsp baking soda
1/2 tsp salt

Roll the dough into small balls, about a tsp worth of dough, and place on a cookie sheet, give them room they will spread a lot, then flatten them with a fork.

Bake for 7 - 10 minutes and you will have soft chewy peanutty good cookies.


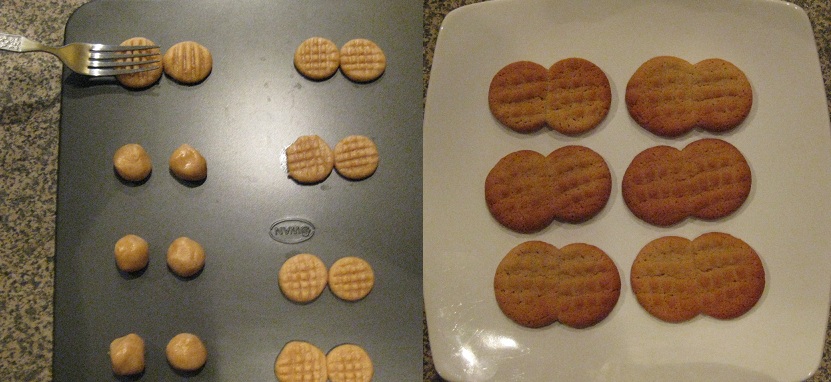
Okay, not traditional in our family at all, but I came across a picture of peanut butter cookies shaped like peanuts and I felt the need to try at least one tray of them.  Take the same amount of dough for a regular size cookie and divide in half, roll into two small balls and place near enough to each other on the tray that they will just touch when fork squished.  Make a double fork squish on each ball at 90 degree angles and make sure that one of them points straight towards the other ball of dough.  The two cookies spread together and form a 'peanut' shaped cookie!

Tuesday, 12 June 2012

home made vanilla extract

I'm so excited, I have to share!!!

Poor vanilla, to be so under-rated and unappreciated in the flavour world, to have gained the undeserved stigma of being a euphemism for bland, dull, and boring.  So unfair, since it is probably the artificial vanilla that has created this reputation, when truthfully real vanilla is so rich, bold, and intense it'll knock you into next week.  Think about it, when you're making a cake or cookies you use a big chunk of butter, a cup or more of sugar, a few eggs, a few cups of flour, volume wise you've got maybe two litres of cake batter or cookie dough and into this gets mixed one stingy teaspoon of vanilla, and if you don't add the vanilla you notice it's missing, you notice big-time.

Vanilla is a flavour I learnt about early in my baking experience.  My Gram LuVerne and Grandpa Bill were snow-birds, a Canadian term used to describe retired folks who escape the cold winter months by basking in the sunshine of the southern USA.  Their annual migration took them to Arizona near the border of Mexico.  A few trips across the border each year brought back exotic gifts for the family that usually included a big one litre bottle of real vanilla extract for my Mom.  Most of Mom's baking recipes were from sources written at a time when artificial vanilla was a widely accepted substitute and real vanilla was difficult to find and prohibitively expensive to buy, or at least that seemed to be the case in our northern, wilderness town, so she often cut the listed vanilla quantities in half when baking and even that tiny little splash of a few drops of real vanilla was still enough to bring the flavours to life.  Every time I was peer-pressured into sharing my baked treats at school, I always got the feed-back that was the best they'd ever tasted, even children can taste the difference real vanilla makes.  (Yes, I had to be pressured into sharing, I was not a popular child so consequently I was not a generous one after I wised up to the lack of reciprocation that always left me holding the short end of the stick.)

There was a time in my life, during and for a few years after university when I avoided the kitchen, cooking and baking were not a priority for me.  And when I resumed interest in the domestic arts, I have to admit that my frugal nature often gets veto power on purchasing decisions.  The first bottle of vanilla I bought was the artificial variety, and the disappointment loomed over all my efforts, I honestly thought my baking skills had been lost because nothing seemed to come out tasting right.  But I persevered through the mediocrity of my results and one day I noticed some real vanilla on sale in the grocery store, I figured I'd need to re-stock soon and even though it was still more than twice the price of the artificial maybe having the real stuff will provide some inspiration.  So many flavour problems were solved with the purchase of that one little bottle!  Despite the price, I've never gone back to the fake stuff, actually I even deemed the lower quality brand a false economy and upgraded.

So check this out!!!  A few years ago, I was in Africa and toured a spice farm, and bought a whole bunch of vanilla pods, they were very well priced, I think I bought half the pods they had at their stall and only held myself back from buying all of them because other people on the tour made grumblings of me being greedy.  I'm a bit bitter that the snarky people didn't even want them because as I passed the stall when leaving I noticed that most of the vanilla pods I left were still there, I would have gone back and bought the rest if there had been someone to take my money.  I thought I used them all up a long time ago, but I guess since my method of rationing a bounty that is running short is simply to hide some of it from myself meant that I didn't and a few weeks ago I was having a rummage through my cupboards and found them.  Of course they were dried out and when I tried to split one open it broke into a several pieces, oh the sadness.  But google to the rescue, I looked up how to make home made vanilla extract, and it's simple as can be.

Only because they were dried out I steeped my vanilla pods in boiling water for a few minutes to soften them but otherwise, the first step was to split them open, then push them into a bottle and pour over some clear alcohol.  Most of the bloggers suggested vodka but I had the misfortune of buying a drink made with vanilla flavoured vodka and didn't like it, Sailor Jerry on the other hand I have found to be quite nice (don't judge me), so I used rum.  I suppose at least I knew that I didn't want to use vodka before making this so choking on the vanilla-vodka cocktail wasn't a total wasted experience.

My bottle was a bit too big for the amount I made based on the alcohol to vanilla pod ratio suggested but I just tipped it on on an angle and rested it against a box to keep the pods submerged and put it in a dark cupboard.  About half an hour after latching the bottle shut, I started to worry that it wasn't going to work at all because the pods were so old, I took it out and was surprised to see the rum already pulling a bit of amber colour out of the pods.  Every few days, give the bottle a good shake to stir it up, after a week it'll start to look impressively brown, and four weeks later the end result is a mysteriously dark, almost black, liquid with a ripe fragrance that dances along the nerves of your olfactory system like perfume.

So it smells good, but what does it taste like?  To test it out I made a baked set custard (like you would for a creme brulee, I just couldn't be bothered with the sugar crust topping) by mixing together 2 eggs,  1/2 cup sugar, and 1 cup milk, I poured equal amounts of the mix into two ramekins and measuring precisely into one mixed a half tsp of high quality store bought vanilla and into the other a half tsp of my home made vanilla, baked for 40 min at 300^F (150^C) in a water bath.

Then tasted them both.  I'm not going to say the custard with the store bought vanilla was bad, it was good and if you served me that one I would have thought you were a kitchen wizard, but the custard with my home made vanilla was holy-moly so, so, so much more intensely flavoured!  I almost couldn't believe it because I really cheaped out on the quality of rum (this was an experiment that might not have worked out after all) and the vanilla pods were so old when I found them in the cupboard and while they were very good they weren't the finest variety of pod to begin with. 

For future planning I did a bit more googling to run the maths:  bulk order of 12 vanilla pods online is approx  £4 + £2 postage, 350ml of the cheapest rum I could find was £6, total cost £12 for 350ml vanilla.  A 118ml bottle of my normal brand of posh vanilla extract at my nearest grocery store is £9.90 which works out to about £29.36 for 350 ml so home made is over £17 cheaper for 350ml.  The most common ratio of vanilla pods to alcohol that I found is 18 pods to 1 litre, I only had 7 pods which is why I did 350ml, if you buy 12 pods and make 350ml vanilla you'll have some pods left over - bonus - or buy more rum and do your own math.  Huge economic savings and tastier, I think I'm going to be making my own vanilla from now on.


P.S. the water I used to steep the vanilla pods to soften them smelled so divine that my frugal nature wouldn't let me pour it down the drain so I tipped it into my kettle and made a cup of tea, it was heavenly!

P.P.S. for my sisters, memories of the Christmas we drove down to spend with G&G in Arizona:  first exposure to outlet malls, that scary looking fence along the US-Mexico border, Dad's bull whip that I nearly blinded myself with, illegal fireworks including those little poppers we threw at each other and got burn marks on our clothes (or at least on my jean jacket), how fast the sun would set in the evenings that far south, wearing shorts and t-shirts on christmas day, all the little market stalls selling carved wood knick-knacks and turquoise jewellery, and cactus hugging photos.

Thursday, 17 May 2012

Nanaimo Bars

One of my favourite treats when I was growing up was a nanaimo bar, they were the only good thing about having to endure the painful experience of performing at the local annual piano student recital, one of the organisers made them for the tea and coffee reception afterwards.  They were also the highlight of the ferry trip to Vancouver Island, the ones on the ferry were particularly good, they were huge and the layer of yellow was super thick, my own personal brick of dizzying sweetness.

Mom never made them, maybe I was the only one who liked them so she never thought they would be appreciated.  The top was melted chocolate that was allowed to set again, that was an easy one.  I could never figure out if the base was made from, I knew it wasn't cake but what was it?  The layer of yellow was the biggest mystery, what on earth was that layer of yellow?  We didn't have a recipe for them and I wasn't adventurous enough to go looking for one outside of the cook books in our home.  But, oh, they were so good, I relished every opportunity to get my hands on one.

About five years ago, I was having a discussion about regional and national foods with a British friend and the only solid examples of original Canadian foods I could think of were poutine and nanaimo bars.  The description of poutine horrified my friend and I couldn't describe nanaimo bars much beyond chocolaty-something with a yellow layer.  Which then prompted my magpiesque curiosity to search for a recipe.  The original recipe can be found at the website for Nanaimo BC, the town for which the yummy treat was named, http://www.nanaimo.ca/EN/main/visitors/NanaimoBars.html but I have made one change to my recipe, sorry town of Nanaimo.  Since I'm not very good at the cooking an egg in liquid to make a thick binding agent type sauce without curdling/scrambling it technique, I have omitted the egg and just use extra chocolate, it's not the worst substitution one could make.


Nanaimo Bars

Bottom Layer
Melt together in a sauce pan over low heat (or in a bowl over simmering water if you're the impatient type that likes to crank the heat up but then regrets it when it backfires)
1/2 cup butter
2 squares of semi-sweet baking chocolate (that's 2 oz or 57 grams)

In another bowl, mix together
1/4 cup sugar
5 tbsp cocoa powder
1 1/4 cups graham wafer crumbs
1/2 cup ground almonds
1 cup shredded coconut (sweetened or not, your preference)

Pour the melted chocolate mixtures over the dry ingredients and stir until there are no dry crumbs left then press into a 8 inch square pan making the top as smooth as possible and chill in the fridge for an hour.

Yellow Layer
The mystery solved, make a butter-cream icing with
1/2 cup unsalted butter, softened
2 tbsp custard powder (Birds custard powder or another brand)
2 cups icing sugar
2 tbsp + 2 tsp cream or milk

Spread the bright yellow icing over base layer, again try to make the top of the layer as smooth as possible, and put back in the fridge for another hour (at this point you can go to the freezer for about 15 min if you're short of time).


Top Layer
Melt together over low heat (or again in a bowl over water)
4 squares of semi-sweet baking chocolate (that's 4 oz or 113 grams)
2 tbsp unsalted butter

Pour over the Yellow layer and spread evenly, I find it's easier to keep the pan on the counter and shimmy it quickly forwards/backwards and side-to-side to get a super slick smooth layer of chocolate on top, too much spreading and you risk denting the yellow layer or melting the butter-cream and dredging it up into the chocolate, ruining the top finish of the bars.  Then back in the fridge to set the chocolate before cutting into squares.

Cut them smaller than you think you need to, they're molar achingly sweet!

Thursday, 3 May 2012

Oatcakes - Grandma Ross

While on vacation in Toronto, Allana and I visited with my my Mom's cousin Kathy and her family (although she's my cousin too) who welcomed me into her family when I first moved there and helped so much with my transition from the wilderness setting of my home town to life in a big city, I don't think I realized or appreciated how valuable that generousity was to me at the time.  We spent our time catching up on all the changes in life and reminiscing about family, and a bit related to my blog memories of my Grandma Ross' baking.  As a result I'm feeling Grandma's spirit is a bit closer right now, so to make her feel welcome to hang around for a bit I thought I'd make some oatcakes.
 
I never made oatcakes with Grandma, I don't really even remember her making them, I just remember sometimes there were warm oatcakes for lunch at her kitchen table.  Reading through her old cookbook and trying the recipes I can understand why she didn't let us help, between mixing in boiling water and speedily trying to roll out hot dough, there was no room for little fingers to get in the way.
 
Given how inexpensive oatcakes are to buy in stores, there's really not a lot of cost saving in making them, sadly I think they might even be more expensive to make yourself, unless I can find a really cheap source of oatbran.  Also they are more than a bit stressful to make but that might be more to do with the level of experimentation I had to do to get the recipe right, however in the future home made oatcakes are going to be saved for a rare and special treat.  If you come over to my home and I have made them for you, please know that you are a most welcomed and much treasured guest.

Grandma's cookbook had two recipes for oatcakes and for so few ingredients they couldn't be more different.  One uses a whopping 1 & 3/4 pounds of meal along with fat, bicarb and salt, and says to be baked in a quick oven, whatever quick means.  The other uses only 2 & 1/2 handfuls of meal with fat, sugar and salt and instructs that the cakes be 'slipped onto a hot griddle and fired on both sides' (figure that one out) then baked in a moderate oven for an hour.  Careful following of directions produced something inedible from both recipes, so after a bit of playing around I have come up with my own, and tried it a few times now and it works quite well.

A few notes, oatcakes are made from fine milled oatmeal, this is not the flaky oats that you use for porridge, it's grainy little chunks, usually sold now-a-days as oatbran.  It looks like this:

Grandma often used bacon grease as the fat, the recipes both called for lard or dripping (which is rendered beef fat, if you didn't know), and if you use bacon grease don't add salt I found the bacon flavour was salty enough.  In my experiments I tried a couple variations of fat, including bacon grease but also lard, butter and vegetable oil, they all work fine although the animal fats gave browned edges to the cakes where the vegetable oil didn't, and the meaty fats made them a bit more savoury which is not suitable to eating with jam.  If you think making pastry is tricky due the the flour absorbing different amounts of water in different seasons or climates then this is tricky x 1000 but infinitely forgiving, in all my experiments I didn't have a single batch that I had to throw away, unlike pastry which holds a grudge and will send troubadours to perform a song and dance about your failure.

Oatcakes

Preheat the oven to approx 400^F (200^C)

In a bowl measure in and mix together
300grams oatbran
1/2 tsp baking soda (bicarb)
1/2 tsp salt
1 tsp sugar

Pour in
4 tsp melted fat of your choice

Then slowly add in boiling water from the kettle.  Add the water a bit at a time and mix with a spoon then add a bit more water and mix, keep going until you start to panic that you could end up making gruel instead of dough, stop adding water but keep mixing until the oatbran starts to swell up and the dough comes together.  You need enough water to swell up the gritty bits of oatbran with enough left over to make the starch that comes out sticky enough to hold together.  If you get carried away and add way too much water, and you actually have gruel, you can add some, but not too much, more oatbran and keep mixing.

Liberally sprinkle your countertop with oatbran (50 - 100 grams depending on how dry or wet your dough is) and tip the dough out onto it, roll it in the oatbran so it doesn't stick to your hands and press into a compact ball then flatten into a disk.  Then quickly roll it out with a rolling pin, it's going to stick to the counter and there's nothing you can do about it, get it down below 1/2 a centimetre thick, it stiffens up fast.  As you're rolling it will feel like you're just pushing/squishing the dough into shape rather than the elastic sensation of rolling that you get with most doughs, it's fine that's what you want.  If you keep getting cracks in your dough and you can't push them to stick back together, you probably didn't add enough water and the grains absorbed it all and dried out the starch too fast, no worries, pick it all up, put it back in your bowl, crumble it up and add more water, mix it up and try again, for being difficult to work with it's a remarkably easygoing dough.

Cut it into squares or rounds or triangles, whatever you wish, and use a pallet knife or flipper or similar tool to scrape the oatcake off the counter, it'll keep its shape (like I said, easygoing), transfer to a cookie sheet, don't worry about them spreading, they won't they might shrink a bit though.  If you have off cut bits or used a cookie cutter to get rounds, you can crumble up the scraps back in the bowl add some more water and repeat the rolling process.

Bake for 10 minutes at 400^F for about 10 minutes but if the edges start to brown quickly cut this time short.  Different fats (and I'm sure different ovens as well) will have different effects so keep an eye on them right now.

Then open the oven, re-arrange the tray(s) by turning them front to back and/or switching shelves so that they don't over-brown.  Turn the heat down to 165^F (75^C) and bake for 1 hour, this is to dry them out and you can walk away until your oven timer goes off.

Eat them warm, with cheese, or deli meats, or butter and jam, or butter and cheese or jam and cheese.  They're nicest with cheese in my opinion, any type of cheese too, smelly cheese, mild cheese, creamy cheese, hard cheese, it's all good.  They'll keep in an air tight container or even a plastic bag for at least a good few days, not sure how long because I'll always eat them all before they have a chance to go stale.

Friday, 27 April 2012

Yikes!

As much as I hate the apology post in other blogs I read, I feel really bad about not posting anything for nearly a month, especially since people have been checking for updates (and not all the traffic stats are from my Mom).  At the start of the month, I went on a wonderful holiday to Toronto, a vibrant city I used to call home, the trip felt like a hug for my soul.  I met up with some family and a few old friends who are leading fantastic lives and don't appear to have aged a day in the past decade, checked up on my old stomping grounds so many of them are the same and others have changed or are gone, and best of all I had some fantastic sister time with Allana who's business trip to the GTA was the prompt for me to make the journey as well.

I have been baking since coming back but I've been having a bit of trouble with one of the recipes and need to take new photos, but there are two posts nearly ready to go if I can just get my ducks in a row.

I'm not the only one having trouble with her ducks being all over the place.